Best Ever Sourdough
Picnic Bread

This is it. Here you go. This is the best, most wonderful, most amazing sourdough bread ever to grace blanket or picnic table. (Mentally insert your own additional superlatives if the above do not suffice.) This is, simply put, the bread you must take with you on your picnic.
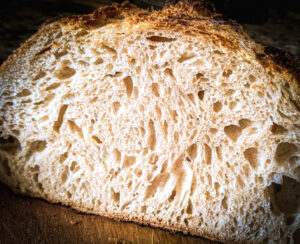
The well-balanced loaf cuts beautifully; it is not too dense and not too light. It bears up well on a hot day. It has a perfect texture, with a good crust, and just a touch of tanginess.
What’s more, it will hold any sandwich fillings you care to throw at (/between) it. Peanut butter with strawberry jam is always a good — and perfectly respectable — option. If you’re looking to go a few notches higher on the picnic-fanciness scale, might we suggest dry salami, cappocolo, pancetta or bacon, and provolone with all the fixin’s — those being lettuce, olive oil, white-wine vinegar, very-thin-sliced onions, salt & pepper, and fresh oregano. And if you’re attempting to make it all the way to the top of the scale, with cloth napkins and champagne flutes and a porcelain platter bearing some impressive entree or whatnot, you’ll still want to bring a loaf along to slice (use a fancy knife) and spread with butter. It works at any level.
And because of the longer rise times, there is ample opportunity for the requisite planning and preparations. While you mix up the dough, figure out your fillings, sides, drinks, and dessert. It’s often best to assemble sandwiches once you arrive, so they don’t get soggy, but you can still get everything nicely lined up. You should also use the rise time to pick your intended location, print or draw out a map (please, no smartphones), and search the basement for your picnic basket. Perhaps a checkered table cloth while you’re at it. Thus, when departure time comes, you’ll be able to enjoy true, well-planned, leisurely picnicking — whether that be duck à l’orange or PB&J.
Good luck. We hope your picnic is the best ever.
Best Ever Sourdough
Picnic Bread

Yield: One loaf
Equipment:
Large mixing bowl (or stand mixer with dough-hook attachment)
Standard loaf pan
Tea towel
Parchment paper
Cooling rack
Ingredients:
Remove the pan from the oven and place it on a cooling rack. After about ten minutes, turn the bread out of the pan and allow it to cool for another hour before slicing (and/or packing in a picnic basket).
Notes:
Alternately for the second rise, the dough can be put in the fridge for a slow, cold rise. 12-18 hours. When ready to bake, take it out and allow it to sit at room temperature for one hour before baking.
Once baked, it freezes well (helpful in the event your picnic is unexpectedly delayed).
You can, incidentally, also enjoy this sandwich bread when not on a “picnic,” per se, in the strict sense of the word. After all, life, allegedly, is a picnic.


